Introduction to Robotics: Material and Pointers
[ Course Homepage | Schedule and Course Material | Videos/Photos | Mailing List ]
|
The NYU computer store has received about 100 Arduino boards on 01/23. Get yours before Tuesday! In addition to the Arduino, you will need the following parts (one set of part for two students is OK). You can either get the Arduino kit box (but the store doesn't have many of them left), or you can buy the necessary items spearately from the computer store:
The TA is Pierre Sermanet [pierre.sermanet [at] gmail [dot] com]. Koray Kavukcuoglu [koray [at] cs [dot] nyu [dot] edu] will also be present in the class on 01/27 and 01/29. The projects for 01/27 and 01/29 are:
Control the speed of a DC motor using Pulse Width Modulation. controlling an electric DC motor: connect the H-bridge chip and control the speed of the motor using Pulse-Width Modulation using the AnalogWrite() function of the Arduino.
3PI robot: calibrating the reflective light sensors. Get this sample code that reads the line sensors 3PI robot: line following with proportional controller. Extra credit for implementing a PID controler. Super extra credit for winning the race.
3PI robot: dead reckoning and driving home. The robot must follow a line, detect the end of the line, and return to the starting point (or as close to it as possible).
You must write a function with the following prototype: you will need trig functions as well as functions to convert the motor speeds to robot speed and rotation. To help you with this, we are providing the following .h file, which contains trig functions, as well as functions to convert 3pi motor speeds to linear and rotational speeds: 3pi_kinematics.h. Add the file to your directory, and add '#include "3pi_kinematics.h"' to your program. The file provides four functions:
Note that the speed and rotation functions have been calibrated on a particular robot. Your own robot may have slightly different characteristics. Also note that the estimates are not likely to be accurate if the speed changes abruptly.
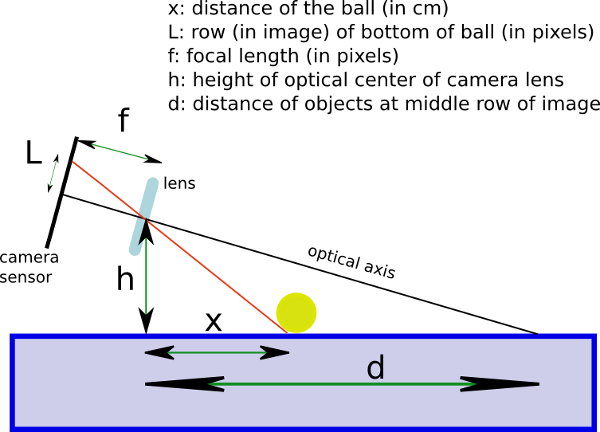
Detect a tennis ball and drive the rovio to it, stopping a few cm before it. You need Lush, which runs on Linux and Mac. You also need the Lush Rovio library. First, you need to estimate the distance from the rovio to the ball. Using the diagram below, find the formula that relates gives x from L, where x is the distance to the ball, and L is the difference between row number of the bottom of the ball in the image, and the middle row of the image.
Next, you need to calibrate the distance driven by the rovio when it receives driving commands. The rovio drives for a short time for each command it receives. If you don't keep sending driving commands at a fast rate, it will stop. If you want to stop it right away, send it a stop command. See the rovio-lib.lsh file for examples.
Get your rovio to play soccer! The goals are bright red. You must be able to detect the goal so you can drive between the goal posts. The strategy is to turn around to find the ball, orbit around the ball until the goal is visible, and drive towards the goal.
|
||||||||